Many owners of private houses, wanting to increase the useful area of \u200b\u200bthe building, seek to attach various structures to it. One of the most common is an open veranda. Consider how a terrace is made of wood - the most affordable building material in our country.
We draw up an extension project
Before you start building a veranda made of wood and any other materials, you should carefully study the project documentation. This will allow you to pre-calculate all the necessary materials, determine the shape of the future structure, and avoid possible mistakes during construction. Even if you do not have the necessary level of drawing or similar tools, we recommend that you make the simplest sketches of a future building with an indication of its dimensions.
Users often search:
During the preparation of the project, you should consider the entire sequence of work, the most optimal methods for its implementation. Similarly, you should decide on the equipment and tools necessary for the construction of the terrace.
Stage one - laying the foundation
After determining the sequence of construction, a do-it-yourself veranda made of wood is built step by step. You need to start from the base of the terrace, which is a tape shallow or columnar foundation.

As a rule, both types are quite widespread when performing self-manufacturing of house extensions. Consider the features of the data for the future terrace.
Column by Column
Simple and less expensive in terms of materials and physical effort is the columnar foundation of the veranda. It consists of several separate supports of rectangular section in a horizontal plane. The following materials are used for manufacturing:
- red ceramic brick;
- foundation concrete blocks;
- construction concrete blocks;
- masonry sand-cement mortar.
Before installation, pits of 0.6-1m are dug for future posts. The depth of penetration under the terrace supports depends on the quality of the soil and the mass of the future structure. The bottom of the pits is covered with sand and gravel with intermediate tamping. On top of the backfill under the base of the terrace, a concrete pad is poured for leveling.
The wooden veranda should evenly rest on all the elements of the foundation. To do this, the pillars are brought to a common level in height. For this purpose, partially cut blocks or bricks can be used, as well as various thicknesses of joints. After installing all the supports for the terrace, they must be protected from moisture. In this case, ready-made bituminous mastic and a roll waterproofer are used. Similarly, the waterproofing of the heads of the columns under the veranda is carried out.

Tape under the terrace - the pros and cons
For the terrace requires a lot of effort during construction. Main stages:
- marking the tape along the perimeter of the walls of the terrace;
- digging a trench to a depth of at least 0.6 meters with a width of about 30 cm;
- installation of formwork for lifting the tape above the soil level to the beam strapping of the veranda;
- filling the bottom of the trench with sand and gravel;
- manufacturing and installation of a reinforcing frame made of steel rods;
- preparation of concrete mortar in sufficient volume, pouring the tape to the upper edge of the formwork;
- waterproofing of the frozen tape using ready-made compounds;
- backfilling the trench with soil.

As can be seen from the description of the process, the technology for installing a strip foundation under a wooden terrace is a rather laborious and lengthy process, requiring higher qualifications than when installing a column base. In case of improper erection or high mobility of the soil, the tape can be torn and bent, which will necessarily affect the entire structure.
Stage two - the construction of the frame of the building
On the finished foundation, the frame of the structure is being installed. A wooden terrace is made quickly, even alone. For work, you will need a construction beam with a section of 150x150 and 100x100 mm. The first beam will fit on the lower trim - the base of the veranda floor, the second - on the racks and supports for the railing.
Fitting the bottom trim
We lay a beam with a section of 150x150 on a foundation for a terrace previously lined with roofing material. If the dimensions exceed 6 meters - the standard length of lumber in our country, you will have to splice the strapping elements. The technology of the angular and longitudinal connection of the timber is as follows:
- Select the most even, not behaving lumber.
- At the ends, mark the cuts for half the thickness of the timber. The length of the future groove is equal in our case to 150 mm.
- Saw the timber along the markup using a manual or mechanical tool - a carpenter's saw, circular or chain saw.
- Connect the parts groove to groove at an angle or along.
- Strengthen the connection further by driving in 2-3 #150 nails.
To avoid possible displacement of the terrace frame relative to the base (this should be considered at the stage of foundation construction), several pieces of steel reinforcement with a diameter of 8 or 10 mm and a free end length of 200-250 mm are left in the upper part of the pillars or tape. Before laying the strapping, holes of a larger diameter are drilled at the exit points of the steel rods, and the beam is laid on the pins, which are then bent flush.
After completing the timber strapping of the terrace floor along the perimeter, lay several transverse bars of the same section in the same way, installing them in pre-marked and sawn grooves in increments of about 1 meter, fastening them with long nails.
We install racks
To support the roof of a wooden veranda, it is necessary to install several vertical bars at the outer corners and along the long side parallel to the wall of the house. The length of which is chosen in such a way that the height of the terrace roof from the floor is at least 2 meters, and the slope of the roof from the main building is observed.

Scheme of connection of strapping and racks
If the terrace strapping beam is allowed not to be planed, then the racks must be pre-planed with an electric planer. This will give them a more aesthetic appearance and simplify further finishing and processing of the veranda. Fasten the racks to the strapping with self-tapping screws using reinforced steel corners. In the upper part, the ends of the beam are attached to the terrace strapping, which is a frame element that serves to increase the strength of the veranda structure.
The top harness is best made from planed timber 100x100. Assembly is carried out on the ground in detail, after which it is installed on the ends of the racks and attached to them. In this case, it is necessary to make sure that the vertical parts are perpendicular in two planes. To do this, use a plumb line or building level.

Stage three - installation of the terrace floor
The step-by-step process of installing a wooden terrace continues with the manufacture of the extension floor. Particular attention should be paid to the correct selection of material, these are operating conditions associated with constant exposure to moisture and sudden changes in temperature.
A standard pine or spruce floorboard is the worst you can get for a veranda. If you decide to use it, you must definitely treat the lumber twice with antiseptic compounds that protect the tree from decay and damage by various microorganisms. Pay special attention to the processing of boards from the end.
The best choice for a veranda floor is a larch floorboard. Its advantages:
- resistant to moisture and damage by fungi, mold, insects;
- has a beautiful wood structure;
- lends itself well to additional processing with protective and decorative compositions.
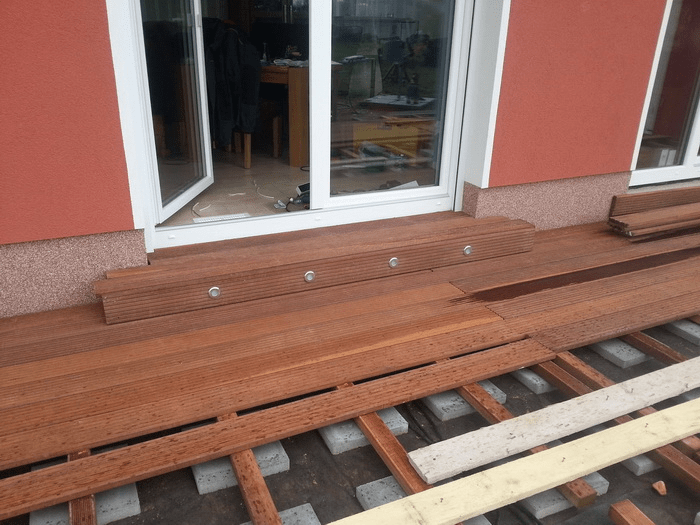
Instead of larch for outdoor terraces, artificial flooring material - decking is often used.

To improve the decorative properties of the entire product as a whole, flooring can be laid not only traditionally along one of the sides of the terrace, but also at an angle to them. With this method, the expense of the floorboard on the veranda will be increased by 20 percent, but it's worth it. It is also carried out diagonally from the center, which requires precise angular cuts that can be made on a miter circular saw.
Stage 4 - installation of the roof
A quality roof will help protect visitors to the veranda and flooring from rain and solar heat. Its frame is made of wood, using a vertical strapping of the terrace and a horizontal beam-base, fixed on the wall of the house. When erecting the roof of the veranda, it is necessary to provide for a slope to in relation to the horizon of at least 15-20 ° in order to avoid the accumulation of large masses of snow.

As roofing materials for terraces, both traditional metal sheets or soft roofs, as well as less common glass or colored cellular polycarbonate, are used. Thanks to the use of the latter, the roof of the veranda can have a radius rounding or a domed shape. Of course, this will require the manufacture of a more complex truss system, but it will give the terrace a unique appearance.
Stage 5 - installation of railings, finishing
Wooden railings will help limit the interior space of the veranda and protect visitors from falling. They are made from profiled metal or planed timber. Balusters will add zest to the exterior interior.
After completing the installation of the fence, the wood should be treated with stains, mordants or oil-based paints, in other words, protect and prepare for use.
In this article, we examined the issue of building a veranda, as it turned out, this is not at all difficult. The main thing is to follow the recommendations and step by step algorithm.
A spacious and cozy veranda, or, as it is fashionable to say today, a terrace, is a great place for a secluded vacation, as well as for fun, stormy parties with friends in the warm season. A well-designed veranda with an original design can immediately become a real decoration of the facade of any private house. Of course, it is best to lay the construction of a veranda in the main house construction project. But do not be upset if you prudently did not do this, because this type of room can be attached at any time.
In this article, we will tell you how to attach a veranda to the house with your own hands, consider options for a polycarbonate veranda, as well as an open veranda, give photo and video instructions.
Location
As a rule, a veranda is placed in front of the main facade, but it is not forbidden to place it in front of the side facade, if necessary. It is important that the veranda is clearly visible from the gate (the main entrance to the courtyard) and has a passage to the rooms of the house.
The decisive role in calculating the length of the veranda is played by the length of the facade of the house along which it will be completed. With a width, everything is much simpler, usually it is about two and a half meters.
Before starting construction, do not forget to prepare the workplace, i.e. clear the area, dismantle the porch and the canopy over the entrance.
Foundation

For a frame or wooden veranda, a columnar foundation is well suited, i.e. foundation with the installation of brickwork pillars under the corner posts.
For a light veranda of small size, columns placed in the corners will suffice, and for a larger extension, intermediate racks with additional columns should be installed (in 50 cm increments).
The sequence of works on the construction of the foundation:
- First, holes are dug at least one meter deep.
- The bottom of each of the pits is covered in layers: first of all, 20 cm of sand are poured, and then 10 cm of gravel.
- A concrete base is poured (approximately 15 cm) and some time is given for the concrete to set.
- Brick pillars are laid out. Their above-ground part is brought to the height of the main foundation or slightly lower. The height of the brick pillars of the foundation is made, as a rule, 30 cm below the finished floor level.
- Each finished post should be smeared with hot bitumen.
- The cavities of the pillars are filled with brick fragments or fine gravel.
- The gaps between the pillars and the ground are covered with sand.
frame

The frame of the veranda, as a rule, is made of wooden beams, the section size of which is 120x80 or 100x200. Logs (with a diameter of ≤ 12 cm) are sometimes used for the same purposes.
They begin to build a wooden frame, usually from the bottom trim (preferably double). The connections of the bars should be carried out with a direct lock. At the level of the second log, logs and vertical posts with spikes (50x50) are cut into the harness. The entire structure is fastened with nails, and for greater reliability, staples are used.
The most correct distance between the bearing racks is 50 cm, but, as practice shows, this value is greater.
The roof truss system and the top trim are installed on racks. Racks can serve as solid wooden beams, or connected two boards (section 120x40) with a gasket between them. For fastening the rafters, a horizontal beam is used, passing under the slope of the roof of the house. The beam and posts should be fastened with anchor bolts. During the installation of the veranda frame, make sure that the roof of the veranda being erected fits well with the roof of the house.
Roof

Undoubtedly, the roof of the veranda should be a continuation of the roof of the house. It is recommended to perform it from the same roofing material, but other types are also allowed. Roofing material is attached to a wooden crate. The crate is mounted either at intervals or close (depending on the type of roof).
- The boards are fixed closely in the case of using rolled material. When attaching the flooring to the rafters, nail heads should be sunk into the wooden surface (they should never protrude). The rolled material is fastened along the edges with nails, and for additional fixation, slats are nailed to the coating. The protruding edges of the roll should be folded inward and fastened with nails.
- If steel roofing material is used for the roof, then it is attached to the crate with nails and joined with a “seam” seam.
- Asbestos cement sheets are overlapped. At the same time, the upper sheets overlap the lower ones by at least 14 cm. They are fixed in pre-drilled holes with nails or screws.
Floors and walls

Usually the floor is made of wood, taking wooden boards coated in advance with an antiseptic as a material.
The veranda can be left open, or you can build walls by building them from wooden shields or lining. In the second option, do not forget to take care of the windows.
Do not over-insulate the walls of the veranda, because it is considered a summer relaxation room.

After the floor, frame and roof of the veranda have been made, you can proceed to sheathing the structure with polycarbonate. So, you will get a bright and light veranda, where you can have fun in the warm season.
Polycarbonate is a translucent material made on the basis of carbonic acid polyesters. It is produced in the form of honeycomb or monolithic panels. In cellular polycarbonate, there are cavities between stiffeners that connect two sheets together. They often replace glass when arranging verandas. This is due to a number of positive properties of the material.

Although polycarbonate appeared on the construction market not so long ago, it is very popular among consumers. Why? The reason for this is the unique properties of the material, which has no analogues on the market today:
- High strength. These figures for polycarbonate are 20 times higher than for glass. If polycarbonate is damaged, then it will not crumble into small fragments, like glass, but will break into fragments that do not have sharp corners. Thus, the injury risk of polycarbonate is minimal.
- High light transmission rates - up to 86%. Due to the fact that part of the light is scattered, polycarbonate creates protection from direct sunlight. Partially absorbs ultraviolet light.
- Polymer panels are flexible, making it possible to design curved shapes. Polycarbonate can be bent without special equipment, right at the installation site.
- The temperature range is from -40 to +120ºС. And this implies that polycarbonate is not afraid of either the scorching sun or severe frosts.

If you do not have much experience in construction, then do not worry. This technology is up to you to master and implement. Initially, you should make a foundation, fix the elements of the frame in it. After the concrete has completely hardened, you can begin to manufacture the frame. How to make a foundation and a frame made of wood has already been described in the article.
For the manufacture of a metal frame in this case, a thin-walled galvanized sigma profile will be used. Frame installation features:
- No welding is required, as all connections will be made with bolts. For this you will need a wrench.
- The main fastening of the beams - anchors, laid in the foundation. If they have not been installed, then you will have to drill holes in the foundation and screw the check bolts into them, and then fix the beams.
- Sigma profiles are fastened with standard fittings.
If you made a frame from rolled steel, then it must be treated with a primer and then painted with paint for metal. Thus, you protect the frame from corrosion.

Now you need to cut the polycarbonate to fit it to the required size. This can be done with an electric jigsaw. It is important to take into account that the sheets must be tightly pressed to the surface.
If you cut polycarbonate too quickly with a jigsaw, it will begin to melt, and if this work is done too slowly, the material will burst.
To create a temperature gap during the assembly of polycarbonate sheets, it is necessary to ensure that the screws are not clamped all the way. In addition, when installing polycarbonate under the washers, gaskets must be laid without fail. This will protect the material from damage and leakage. Holes in polycarbonate should be slightly larger than the diameter of the legs of the self-tapping screws. So, with temperature changes, polycarbonate will narrow and expand without deforming.

The installation of the roof is carried out according to the scheme already described in this article. If desired, you can also make it from polycarbonate. In this case, your building will be very light. Polycarbonate is laid on the roof according to the same principle as on the walls.

The open veranda is a frame building without walls, and the roof is installed on beams. This design has a number of advantages and disadvantages.

Of the indisputable advantages of an open veranda, it is worth noting the following:
- Ease of installation. Its construction takes a minimum of materials and time. It's easy to bring her up.
- Easy care. Such a veranda is more of a part of the street than a house. Therefore, to keep it clean, it is enough to sweep the floor regularly.
- An open veranda will allow you to enjoy the opening landscape and breathe clean air while on it.

Like all man-made things, an open-type building also has disadvantages:
- Unsuitable for operation in the cold season.
- It is impossible to install upholstered furniture on the open veranda, since it will be impossible to take care of it, which means that staying here will be deprived of a certain home comfort.
- Difficulties may arise with the choice of finishing materials, as they will be subject to the negative influence of the environment.
The open veranda is not glazed and no walls are erected on it. It is often used as a gazebo. Build it in a frame way.

For construction you will need:
- Concrete pillars for the foundation.
- Beam for the frame with a section of 150 × 150 mm.
- Cement and sand.
- Beam for strengthening the frame with a section of 120 × 120 mm.
- Bracket for beam connection.
- Sheathing for the lower part of the veranda. It can be OSB, forging or slats in the form of plates or balusters.
- Self-tapping screws for wood 100 mm and 25 mm for fastening OSB or wooden lining.
- Wooden lining.
- Beams for roof mounting 150×150 mm.
- Anchors 150–200 mm.
- Krokva 60×120 mm.
- Roofing material, for example, metal tiles or ondulin.
- Boards for the manufacture of roof lathing.
- Logs 100 × 100 mm.
- Wind board.
- Floor board 30–40 mm.
- Paints and varnishes for woodworking.
- Roll waterproofing for the foundation.
- Drill and saw.
- Level.
You have already familiarized yourself with the method of making the foundation, so we will miss this point in our description of the construction of an open type of building. And now let's move on to the features of the device floors.

To carry out a high-quality installation of the floor, you must first prepare the base. To do this, the earth is first leveled and rammed. Adjustable supports can serve as supports for the logs. Moreover, their number will directly depend on the planned loads on the floor. This idea is great for open verandas.
Then install the logs on adjustable supports and fasten them. Thanks to these supports, you can adjust the slope of the floor and level it. Installation of boards begins from the edge of the veranda parallel to the logs. Boards must be level and dry. They should be placed closely. Fastening boards to the logs is carried out with nails or wood screws.
The wooden floor is short-lived, as it does not withstand long-term exposure to an aggressive external environment. If you want to make a more durable floor on the veranda, then you can replace the boards with decking or, as it is also called, a terrace board.
The device of the frame and roof does not differ from the technology described in this article.

In order for the wooden elements of the open veranda to last longer, they should be impregnated with special antiseptics and coated with paints and varnishes. Among other things, these actions will highlight the structure of the tree and help make the extension more attractive.
The lower part of the veranda also needs finishing. To do this, you can use slats that are fixed at an angle of 45º, forged elements or balusters. If you use a wooden or plastic lining for this, then under it you will need to make a frame of bars.
To finish the ceiling and the pediment, you need to use one material. It can be wooden lining or OSB boards. At this stage, it is important to run electrical cables for lighting the veranda and make appropriate holes in the ceiling sheathing.
High-tech veranda


Very often in a country house there is not enough additional space for relaxation. You can supplement the building with an additional living room, but a simpler option is to add a veranda. The dimensions of such a room and its appearance can be very diverse, which entails certain subtleties of the construction process.
Room features
The planned construction of a residential building usually does not include a veranda, so this object often has to be added as needed. If the house has small dimensions, then often it lacks an area for additional storage of things or exclusively for relaxation. As soon as the need arises to organize such a space, you need to think about how to attach it to a residential building.


Type of veranda can be different, first of all, it depends on the material from which it is made, which, in turn, depends on the construction of the house itself. For a brick building, it is better to make the same veranda, since an attached structure made of a different material will be less reliable. The design of the extension must be either completely or partially closed, because the purpose of this new space must have some kind of function, and the more of them, the better.


When planning the location of the veranda, it is important to take into account the part of the house on which it would be best to complete the building. Usually this is the north side, where a real room is added to the house, where you can comfortably spend time at any time of the year. The veranda can replace a summer kitchen, where you can cook and eat in warm weather, can serve as a place for the whole family to relax, because in summer you can hide from the sun and be in nature, opening all windows as much as possible, and in spring and autumn it will be possible contemplation of the surrounding landscape without leaving home.


When the veranda is assigned the role of a gym or a hobby room, it is best to place it in the direction of the windows to the garden so that the view of trees, flowers and bright greenery inspires accomplishments. When the extension serves as the entrance to the house, it is organized opposite the gate in order to maximize the convenience of getting into the living space.


As soon as the idea of \u200b\u200bbuilding finally matured in my head, you need to build it on paper and get down to business. The process is not the most difficult, but with improper planning and execution, the result can be very upsetting. For a capital-type veranda, a mandatory element will be the foundation on which an additional structure is attached to the house. Dimensions can be different, it all depends on the size of the house and the purpose of the new room. If the house is large, then you can add a gazebo to any length of the finished wall, as for the width, it is almost always two meters.


The dimensions of the veranda should not be made very large, because this is an unheated room, and it will be cool from a large cold room and in the house itself. It is optimal to make it half as small as the existing wall, provided a large house. If it is small, then it is quite appropriate to add a full-fledged room to the width of the house and to the required length, which the land plot of the yard allows.

Material selection
To build a good veranda, you first need to decide on the materials from which it will be built. You need to pay attention to each stage of work in order to achieve a good result. It is best for a brick house to complete the veranda from brick, because it is easier to connect the same materials together and create a solid and reliable structure. For this type of work, it is important to make a foundation, because the building will have considerable weight and over time the soil will begin to sag and cracks will appear on the walls. It is important to make a sufficiently strong foundation, filling the trench with cement or making supports, placing the finished structure on them.


It is important to make the floor from a bar so that it is strong and powerful, then the coating will last a long time and will not cause any problems. On the beam itself, you can fill the boards and make a simple wooden floor, or use any other coating suitable for the veranda: laminate, linoleum, ceramic tiles. The walls are built of brick, and their height can be very different. The higher they are, the warmer it will be in the room, and the lower they are, the more light they can let in. You can practically do without them, using polycarbonate walls instead.


A fully glazed veranda would be appropriate if it is made of high-quality double-glazed windows, where all seams are hermetically sealed and no gusts of wind penetrate inside. In this case, it will be pleasant to be on the veranda at any time of the year, because the picture of the surrounding world will be as close as possible and any family member can please himself with it.


It is best to build the same wooden veranda to a wooden house, because as soon as an extension made of wood will look logical in the general interior of the room and it will be much easier to work with materials of the same type. The foundation is not needed in this case. A frame base of the floor and walls is created, which are then sheathed with selected materials. A veranda decorated with carved wood patterns or original laying of materials during work will look beautiful. The window frame for this type of building may be plastic, but glass will be able to convey color better, although there will be a risk of small drafts. Wooden verandas will be less capital than brick ones, but you can choose a different purpose for them and make full use of the new additional space.

In each of the options you need to make a roof. The lighter it is, the easier it is to install, and the less weight it will give to the structure itself. Having made the frame, it is necessary to sheathe it with either corrugated board or metal tiles. It is better to choose the color of the coating to match the roof of the house or as close as possible to it, so that everything together looks like one whole, and not disparate objects that are artificially connected together.


Constructions
As soon as the plan for the construction of the veranda has matured, it is necessary to take up the planning of each stage of work. The first point will be to determine the place where it is most logical to locate a new room.
Veranda can be:
- angular;
- end;
- facade.


As soon as the issue is resolved with the first task, you need to decide on the degree of closeness of the veranda.
There are only two possible options:
- closed;
- open.
If only a closed type of building is planned, it provides windows that can be opened for ventilation, and an open type of building is already a terrace. In a closed building, sliding elements can be provided that will help open the space as much as possible, which will make the room combined.


If the veranda is planned at the stage of building a house, then its design may have several options:
- built-in;
- attached type.


It is possible to build a veranda during the construction of the house itself, and attach it after the completion of the main process or even many years after that. Due to the fact that the design may differ, even greater variety can be seen in the forms of the veranda that can be built:
- rectangular structures;
- round and semicircular structures;
- polygonal extension, most often containing six corners.


When choosing one of the options, it is worth remembering that the veranda should not only serve as a kind of room, it should also beautifully complement the house, decorate it and become its highlight.


While all the documentary cases are going on, there is time to deal with the designs of the veranda and choose the most suitable one for a particular house. It is important to initially decide whether it will be a full-fledged room, a warm veranda or an ordinary light building. For private houses where they live all year round, a winter veranda is much more preferable, because it can be considered a living space. An exclusively summer building will be used only in the warm season, which reduces its versatility.
The arrangement of each of the premises will depend on many factors. If the veranda is insulated and closed, then you can place a sofa, armchairs in it and use it as a living room. In the case of an open veranda, it is better to place wicker furniture on it, which will not be affected by precipitation and which can be easily removed if not needed.


Having chosen a closed type of veranda for construction, sometimes it becomes necessary to build an additional open building. A gazebo is a good option for those who like to sit outdoors. Its dimensions can be quite small and, if desired, it can even be moved from place to place. If there is no desire to build a large number of buildings, then it is best to make a combined veranda, which will be completely covered, with windows, walls, but with sliding elements.


The design of the veranda can be angular, if it is not possible to place it along one of the walls, or L-shaped, if there is a desire to combine an open and closed structure under one roof. The roof of the main extension should be capital and fully protected from all the vagaries of nature. For a gazebo, it will be enough to make a canopy, which will partially cover from the sun and rain, but the extension will perform the main function in the warm and dry season.


We beat the area
Depending on the dimensions of the house itself, the dimensions of the veranda will also differ. The internal content of any space will be dictated not only by its size, but also by the functional purpose for which it was built. The average dimensions of a comfortable veranda are 170 by 400 cm, but there are also small options, the length of which will be about two meters.
When there are unlimited possibilities for the construction of additional buildings, then their size will depend on what is supposed to be done in the room. If the veranda is planned as a gathering place for family, friends, a room for summer holidays and cozy gatherings in the evening, then it is very important to build a room with sufficient dimensions. It should easily accommodate a table and a sofa, you can arrange a mini bar, and in some cases even provide for a barbecue. Thus, the optimal area of such a room will be 25 m2, and the length of one wall should not be less than five meters.


When only a few people live in a country house and there is no need to make large additional rooms, the veranda can be made such that a comfortable chair and a coffee table can be easily placed there in order to be able to enjoy nature alone or in the company of one or two people. The dimensions of such a room can be two times smaller.
The area of the veranda also depends on the type of its construction. If this is a rectangular room, then most often the length ranges from four to six meters, and the width is from three to four. In a square, all walls will have the same length. This option is rarely used for the entire width of the house, most often it is a side extension of small dimensions. For lovers of unusual shapes, you can build a veranda in the form of a semicircle or triangle.


Based on the choice of the type of building, materials for the frame, walls, glazing, floor and roof are also selected. Each construction option involves its own type of roof. For narrow verandas, a shed roof is suitable, in square and rectangular ones - a gable roof, and for original buildings, the roof can also have an unusual look that will fully correspond to the style of the building.


If the plot of land on which the house stands has extraordinary dimensions and it is very difficult to build a veranda near the house, you can make this room in the form of a separate building that has a common passage with the house. Usually it is made in the form of a glass corridor, but combined compositions can also be used. In this case, it is possible to create an overall veranda of the original form. It can be a circle or a polyhedron, and the distinguishing feature will be an almost complete overview of the area around it. The dimensions of such a structure can be any, the main thing is to harmoniously fit it into the existing territory so as not to spoil it and make it possible to enjoy it every day.


Interior design
The appearance of the veranda is important, because it must fit into the overall concept of the exterior and be in harmony with it, but the interior arrangement of this room is much more important. The use of various materials will depend primarily on two factors - the size of the room and its location relative to the cardinal points. If the building is small, it needs to be filled with light as much as possible, the same applies to their location in those parts of the house where there is little sunlight.
If the veranda is large, spacious and bright, this makes it possible to experiment with materials, shapes and even textures, especially in the case of a closed type of building. It is important to decorate not only the walls, floor and ceiling, but also to use specially selected furniture.


Another important factor that significantly influences the choice of building materials and furniture to be used is the heating system. It is important to design an unheated area so that the material lasts as long and firmly as possible and does not have to be repaired annually. Finishing of all walls must be of high quality. In the work on the veranda, you cannot save money, otherwise all the work done inside the room will soon come to naught.
Each element of the veranda must be functional, beautiful and resistant to various external influences. The floor is an important element in the arrangement of the extension, it can be sheathed with ordinary boards, but such a coating will be cold in the winter. It is best to use heaters on which to put an additional layer of chipboard or fiberboard on top. You can finish the floors with laminate or tiles.


If we talk about the walls, then for wooden buildings it is best to upholster them from the inside with clapboard, which has a pleasant color and texture and creates an imitation of a real wooden house. Working with this material is quite simple, it is reliable and durable, which means that the interior decoration will last for many years. If desired, it can be painted in any color, this will give freshness to the interior and additionally protect the wood from damage.
You can also hem the ceiling in the veranda using various materials. The cheapest will be a fiberboard sheet, multifunctional - drywall, the most beautiful - a suspended ceiling. Sheathing with fiberboard sheets looks the simplest, but it can be stylishly decorated with foam tiles that are glued directly to the existing surface. It is important that the roof itself, its external coating and interior decoration are made of high-quality and lightweight materials so that there is no strong pressure on the foundation.


For the same reasons, the walls of the veranda itself can be laid out not from bricks, but from foam blocks. They have less weight and the construction is built in a shorter time due to the significant dimensions. This material can be faced if the blocks do not have a completely presentable appearance, or left untouched if even and beautiful seams were achieved during construction, and the foam blocks themselves were not previously used and have an ideal appearance.


As for the interior itself, it is not difficult to equip it.
The most common styles for this are:
- oriental theme;
- ecostyle;
- Scandinavian motifs;
- provence;
- country and similar directions.


The arrangement of the veranda in any of these options has one thing in common - these are natural materials that should be used in the decoration and furnishing of the room.
To give warmth, coziness and comfort, there are a number of items that will be appropriate in any style:
- decorative pillows for sofas and armchairs;
- beautiful tablecloths on the table, the use of embroidery, ornament, interesting pattern;
- for certain styles, it will be appropriate to use chair covers;
- to give a romantic effect to the interior, you can add candles on decorative candlesticks;
- the use of paintings, photographs will create a complete look.


By erecting a veranda in a private house, you can make a functional full-fledged room out of it, where it will be dry, warm, light and comfortable. In addition to the recreation area, you can use such a room as an office, living room, kitchen with dining room, greenhouse and even a children's room. Having all the necessary tools and materials, without violating the construction technology, you can make a full-fledged room that will become for someone a real personal space or a public domain and a place of rest.


landscape design
When equipping the territory of a country house, it is necessary to think over both the construction of housing, verandas, and other outbuildings, if necessary, but also pay attention to green spaces, which play a very important role. If the territory is being developed in the country, then in addition to the garden itself, the garden and the vineyard, it is important to make an area with flower beds, ornamental trees, and alpine slides. These elements are traditionally placed in a place where it is most convenient to contemplate the man-made beauty.
If the house has a veranda, then it is necessary to put the earth outside not just in order, but to make a miniature garden, which will look interesting and please the eye. Exotic lovers can place a rock garden on the site, and those who prefer to relax with the sounds of water should organize a fountain or similar structure where it will constantly circulate.

Trees along the edges of the decorated area can be large enough to delimit the recreation area from the garden or yard. It is important to use a variety of plants that will create a symbiosis of shapes, colors and sizes, but they must be correctly and beautifully arranged.
If the site outside the veranda has a slope, then this disadvantage can be interestingly beaten. One option would be a ladder of different types of plants that are planted on the same level, each of which is clearly divided by height. It will be very beautiful if a small pond or fountain is organized at the bottom of such steps. For a territory that is very small, it is possible to artificially create uneven soil. Ravines and hillocks will visually make the space larger and make it possible to use more green spaces of various types.


If the landscape is being developed for a long time, then it is important to do it right by providing a drainage system with wastewater discharged into a special sewer. This stage is the very first, before new land is brought in and plants are planted. When laying all the pipes is ready, you need to take care of a layer of drainage material. Once all the preparations are made, you can begin to introduce the soil on which all the plants will be planted.

Usually, behind beautiful landscapes, there should be a fence separating the territory of the house from neighbors or the street. This design often spoils the appearance and overall impression of nature, therefore it is recommended to hide it behind a hedge, which is most often made from coniferous trees that grow quickly and have a beautiful appearance. Another important element is the lawn, which can have a different look depending on its purpose. If children or pets will play on it, then you need to buy tougher grass, but in the case of an exclusively decorative effect, you can plant elite varieties that are distinguished by their sophisticated structure, pleasant color, but requiring more attention and care.


With regards to trees, they are planted a little, because they grow quickly and attract all the attention. If you plant only a few plantings, then you need to choose those species that will have a beautiful and interesting appearance all year round. These are arborvitae, maples, nuts, chestnuts, oaks, spruces and other options. If the area near the veranda has a large area, then the composition will have the main focus in the middle in the form of high group plantings and smaller ones near it. Very popular and hedges.
If it is possible to form paths in the area to be decorated, then they can also be planted with shrubs on both sides. It will be beautiful if these plants are cut regularly, which will give an even greater decorative effect to the landscape. If we talk about a flower garden, it is important to plant flowers in it so that some blooming ones replace others, and this process begins in early spring and lasts until late autumn. In addition, it is advisable to seat them according to colors, so that there are no options of the same tone next to each other and each new species pleases with an interesting and unusual shade.


The final touch in the design of the landscape design of the territory of a country house with a veranda will be the arrangement of lighting. In the evening, being on the veranda, it is very pleasant to look at nature in the rays of the setting sun or under artificial lighting. If this is not the case, then all the beauty outside the window will disappear with the last rays and nothing will be visible until morning. With the help of small lamps, flashlights and light bulbs, you can slightly illuminate the area, arranging them so as to focus on the most beautiful specimens. You can also install lighting near the water, making the site even more beautiful and mysterious and be able to admire it at any time of the day or night.
Beautiful examples for inspiration
Having a country house, it is important to make sure that everything in it is beautiful and functional. This also applies to the veranda. In this space, you can organize any room, while using additional elements. A veranda with a fireplace or a stove will have a cozy and warm look. In the cold season, these devices will help warm the air in the room. If the veranda is not used during the cold season, then you can not heat it. In a private house, it would be appropriate to organize a veranda with a barbecue in order to make delicious barbecue or other dishes on fire as soon as possible.

The suburban area is characterized by the construction of a low house, although there are also two-story houses. As for the veranda itself, it belongs to a one-story room, which can be fully or partially residential, depending on the type of building.

The veranda in a country house can be made of double-glazed windows and look like a completely transparent structure, which adds lightness to it and does not clutter up the space.

If a private house lacks a zone in which you can gather with the whole family or arrange a meeting with guests, then the veranda will be an excellent solution to this problem. To do this, you need to equip it with a living room with kitchen elements. It is important that the interior is warm, but has country motifs in the form of wicker furniture and a wooden table with a bench.

If the veranda is being built in order to create personal space and the opportunity to be alone with yourself, then for such a room it is important to use comfortable upholstered furniture, place a coffee table next to it, placing it all in front of large glass windows that open a full panorama of the entire area, which was carefully prepared specifically for these goals. This is a budget option, but it is he who is best suited for a good rest.
Country rest in the country is, first of all, the opportunity to breathe the fresh air of a garden or forest twenty hours a day. It is impossible to relax and at the same time be in a stuffy box of a country house, therefore, a summer resident who values his health sooner or later equips a full-fledged summer terrace with an awning or a roof at the dacha with his own hands. Building a terrace with your own hands is much simpler than a gazebo or veranda, so arranging a special platform for a table and garden furniture, as a rule, will not require large investments, despite the fact that the effect will be quite impressive.
What is the secret of the terrace
Despite a certain external similarity between the veranda and the terrace, the purpose of these buildings is different, as, in fact, the sizes and designs differ. A veranda is a part of a house with closed walls, windows and a full roof. The terrace is a landscaped outdoor area for relaxing on a sunny day with a canopy, awning or awning. The difference is easier to understand if you look at a photo or drawing of a classic terrace.

When choosing a place and a way to build a terrace with your own hands, you can use the classic techniques for arranging a recreation area:
- In close proximity to the house, using the platform and steps as a porch and platform in front of the entrance to the house;
- Take it out as a separate platform and place it in a cozy, sunny and less ventilated place in the summer cottage. At the same time, a prerequisite is the arrangement of a path, stairs or steps, with which you can quickly get inside the house;
- To build a special type of roof or ceiling for a terrace with your own hands, on which a recreation area will be located.
Important! It is clear that verandas and gazebos are not built this way, so any drawings and recommendations for the construction of terraces can be creatively processed, changing the dimensions according to your wishes. The main thing is that the design is comfortable, durable and safe to use.
The dimensions of terraced areas, as a rule, can be several times larger than the size of gazebos, and even more so, verandas. Almost always, the base of the site is built of wood or composite, raising the structure above the ground so that moisture and dampness do not affect the condition of the boardwalk.

Choose a device, design and dimensions
The terrace is the only building of its kind, designed not to create a shadow, but rather, aimed at providing the possibility of a comfortable and safe stay in the sun. Therefore, when choosing a project and a site for the construction of a terrace with your own hands, drawings and dimensions, it is necessary to take into account the following features:
- In the construction of a site of any size, raised above the ground by more than 18-20 cm, there must be a fence and a railing for the terrace. For buildings that include several platforms located at different heights, intermediate steps and handrails are provided;
- Floors, railings and railings should be made of wood or a similar material, such as a polymer composite. The drawing must necessarily indicate the quality of wood processing and the type of coating applied - varnish or protective composition based on epoxy resins;
- In the presence of a canopy or awning, one edge of the roof must be attached to the main wall of the house, the second rests on stationary supports embedded in the ground to a depth of at least 40 cm with pouring a concrete blind area.
Important! Before choosing a diagram of how to make a terrace, it is important to choose the right material that best matches the design in the drawing.
The easiest way is to build a terrace at the corner junction of two walls of the house, as in the photo. In this case, we build a terrace and automatically get a platform in front of the entrance to the house.
Corner terrace design
The simplest option for a terrace would be to build a platform of wood on a primitive foundation of concrete blocks or slabs, as in the drawing. The corner arrangement provides protection of the terrace area from wind and rain from both sides, so there is no need for wind protection with polycarbonate sheets or wooden shields.
If necessary, you can install a fabric awning, curtain or canopy over the terrace, the dimensions of which will be limited only by the dimensions of the walls of the house. The disadvantages of the design include the fact that with an incorrect slope, a wooden platform can affect the distribution of rainwater, therefore, the calculation and size of the slope of 3-4 ° must be immediately fixed on the terrace drawing. The size of the foundation supports for the flooring must be calculated according to the sketch or drawing, according to the measurements of the entrance opening above the ground level.

For a light frame structure of a terraced area, it will be enough to lay 12-15 concrete blocks or several dozen clinker tiles as a foundation. First you need to remove the top layer of soil, sprinkle with fine gravel, tamp and lay a sand cushion. The most difficult thing will be to withstand the size and thickness of the sand base so that the height of the foundation column or tile supports does not exceed the calculated value according to the drawing.
Geotextiles can be laid on the sand, which well prevents the growth of weeds and grass. To fill the floor of the terrace, experts recommend pre-tying the supports with a bar with laying log beams made of wood. But in this case, it is necessary to increase the vertical size of the terrace in height by 20-30 cm, which is not always convenient. In the simplest case, a beam measuring 60x60 mm is laid directly on the tile and fixed with pieces of reinforcement, hammering it directly into the ground.
The most difficult stage in the assembly of a budget terrace structure will be the sheathing of the flooring with boards. An oak or special deck board made of polypropylene and sawdust, 200x30 mm in size, is best suited.

For your information! The appearance and dimensions of the composite material practically do not differ from the processed natural board. High resistance to moisture and absolute insensitivity to insects and pathogens make decking an excellent substitute for expensive oak wood.
When sheathing the frame of the site, it is necessary to carefully follow the recommendations for the installation of the decking given in the drawing. In a similar way, flooring can be made from ordinary boards pre-treated with an antiseptic.
Building a simple terrace on your own
The average size of the site is 4x2 m. We will install the wooden structure on wooden supports in a swinging pattern. Part of the terrace area will rest on pillars made of twin beams 120 cm long and 100x100 mm in size, the second part of the terrace will rest on the plank wall of the country house. Under the installation of the timber, we drill holes in the soil with a diameter of 90 mm and hammer the supports with a sledgehammer.
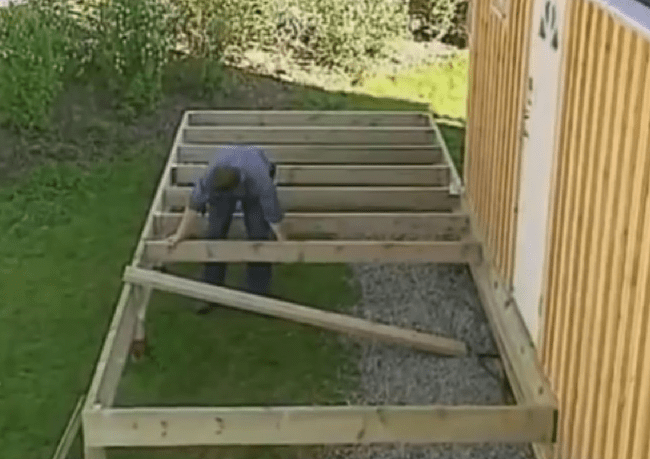
Further, the supports hammered into the ground must be tied with a flat board or a sheet of thick plywood, with a section size of 350x40 mm. When attaching the boards, it is necessary to additionally control the horizontal position of the strapping sheet.

We fasten the side strapping boards directly to the walls of a wooden house, in the supports you will need to wash down for the installation of a longitudinal strapping board.
After assembling the strapping, transverse log beams are installed, 2.5 m in size with a section of 100x40 mm, which will increase the rigidity of the base of the terrace area and at the same time serve as a support for the flooring of the floorboards.

At the next stage, the terrace fence is assembled. Grooves are cut along the outer contour of the site in the floorboards, after which, as in the drawing, the supports under the railing are nailed. A vertical bar or board measuring 100x50 mm, 120 cm high is attached to the bottom strapping board using self-tapping screws. A groove for the crossbars is sawn from the inside of the uprights, after which the lower bar and handrails of the terrace area are installed.

Diagonal struts are stuffed between the posts, increasing the strength of the entire fence structure.
Conclusion
The above terrace design is simple and affordable for do-it-yourself construction. If desired, a small fabric awning or a full-fledged canopy made of polycarbonate or light ondulin can be installed above the terrace area. A wooden structure must be treated with protective antiseptics, and the floor must be periodically treated with wax or paraffin mastics.
There are many options for organizing a place to relax in a suburban area. The fastest and easiest way is to attach a wooden terrace to the house. This simple structure allows you to comfortably enjoy fresh air and sunbathing. And if you make a closed-type terrace that will reliably protect from wind, dust and precipitation, then you can relax in any weather.
The practicality of such an extension was appreciated by many homeowners. With sufficient space on the terrace, the whole family will comfortably accommodate the guests, and if you install a barbecue or barbecue, the recreation area turns into a convenient place for cooking and eating. In a word, the possibilities are endless!
Thematic material:
The best option for beginner builders would be an open summer terrace adjacent to the house. To build such a structure correctly, you need to understand all the stages - from drawing up a detailed project to carrying out finishing and decorative work. Where to start?
Terrace design features
A place to relax on a suburban area can be designed in the form of a free-standing gazebo, a closed veranda at the entrance to the house or an open terrace.
The latter option has a number of features that distinguish it from other buildings:

Where to build a terrace
The place for the construction of an open area is chosen taking into account:
- which side of the house is illuminated by the sun;
- view from the terrace;
- soil features - the nature of the soil affects the choice of foundation;
- the landscape of the site - the building should organically fit into the overall design of the courtyard and be in harmony with the style of the house.
Often an open area is located near a pool or natural reservoir. The shape of the structure can be different: rectangular, round, asymmetric, curved.
Multi-level terraces are interesting, eliminating the need to make separate steps and providing an effective drain.

The building can be placed:
- next to one of the walls of the building on a common foundation;
- around the whole house;
- separately from the dwelling - in this case, the terrace resembles a gazebo.
Material selection
What is the best way to make a terrace? There are many options.
- Wood. The wooden structure is durable, reliable, provides maximum comfort and a homely atmosphere. Construction will be the most economical and least labor-intensive.
- Stone, concrete, brick. It is more difficult to work with these materials, they cost more and do not allow to realize some of the design ideas.
- Metal. Beautiful railings and construction posts are made of steel or cast iron. But this option is costly from a financial point of view. Also, not everyone can work with metal on their own - you need to at least own a welding machine. In addition, rest on such a terrace will be less comfortable, as the steel heats up a lot in the sun.
- Wood-polymer composite, or WPC. This raw material is the cheapest and easiest to process. Thanks to the PVC coating, the material does not need to be protected from decay by impregnations, like elements of a wooden structure. Externally, the WPC is attractive - it resembles the texture of natural wood.
When building a terrace, it is not necessary to use new materials; you can also make a recreation area from the remains after building a house. The main thing is that the boards, concrete blocks for the foundation and other elements have no defects and are treated with special impregnations that protect against moisture and temperature changes. Only in this case, the design will be strong and durable.
Drafting
Before, it is important to understand all the details of design design. A properly drawn up and approved construction plan is a guarantee of the quality and legality of the construction.

What should be in the project?
The drawing reflects the following technical characteristics of the design:
- area with exact dimensions;
- materials used;
- weight of the structure;
- type of foundation.
When drawing up a project, it is important to take into account the features of the place chosen for placing the terrace: the type and structure of the soil, the technical condition of the wall and foundation of the house, and climatic factors.
Users often search:
Since it is quite difficult to make a terrace drawing on your own, the best solution would be to contact a specialized design organization. Professional engineers will draw up a construction plan taking into account building codes and the wishes of the customer.
Project approval
Despite the fact that the house is the property of the land owner, changes to the design of residential premises must be agreed and approved:
- fire safety service;
- bodies of sanitary and epidemiological control;
- local administration.
Without a complete package of documents, the building will be considered a self-construction, which will not allow selling, donating, exchanging the house in the future, or using the property as a loan collateral.
Stages of construction of an open terrace
An extension to the house of a recreation area is carried out in several steps:

The last step can be omitted, but additional elements will make the design original and functional.
A strip or column base is suitable for a terrace. However, builders often resort to a simpler option - using a curb stone for the foundation. In this case, the work is as follows:
- With the help of reinforcement or wooden pegs, the boundaries of the future building are marked. For the convenience of further work, a twine is pulled around the perimeter.
- Temporary supports made of bricks about 40 cm high are installed in the corners.
- Logs are laid from above at an angle to the house of about 2 ° (this will ensure a good runoff of precipitation). For alignment use the building level.
- A string is pulled along the top of the lag, the lags are removed.
- Instead of temporary supports, columns are made of concrete.
- Between the racks, trenches are dug under the curb stone and poured with concrete.
- Install stones.
- When the mixture hardens, the gaps between the foundation elements are covered with expanded clay for thermal insulation.
If the structure is new, the foundations of the house and the terrace should not be rigidly connected - the shrinkage of the building will lead to the destruction of the extension. If the house has been standing for a long time, the foundations are combined with metal fasteners.
Wooden deck construction
Step-by-step instructions for installing a floor for a terrace:
- Logs are installed on the foundation.
- Mark the places for attaching the beam.
- The crossbars are fixed with metal corners.
- Mount boards. Before this, the tree is carefully treated with impregnations from decay, bacteria and fungus. Small gaps are left between the boards for ventilation and temperature deformations.
- The edges of the flooring are hewn for greater aesthetics.
- The surface is varnished or painted.
It is advisable to use larch, as it is rich in natural resins and is ideal for outdoor buildings.
If the terrace-deck seems too simple, the structure can be supplemented with auxiliary elements, such as a roof.

There are several roofing options for the terrace:
- the structure adjacent to the house - is laid on the rafters made of wooden beams, attached to the upper harness on vertical racks;
- polycarbonate roof;
- construction of transparent slate;
- removable canopy in the form of a stretched awning.
However, you don’t have to bother with the construction of the roof - simple umbrellas will perfectly protect from the sun. However, in this case, furniture and decor will have to be removed every time heavy rainfall begins.
Terrace decoration
Decorative elements are striking in variety. For example, in an open area for recreation, wooden fences are installed, consisting of three parts: racks, railings and balusters. These elements are attached to the supports on which the roof rests, or to their own vertical beams.
As an alternative to wooden fencing, light fabric tulle is used, which creates a feeling of airiness, decorates the terrace and protects from sunlight.

Mandatory elements of the recreation area are tables, chairs, sun loungers and other furniture. Additionally, you can decorate the room with potted plants or hedges around the perimeter of the structure.
Thus, the construction of a terrace is the best option for a novice master. It is not difficult to build an open area with your own hands - you just need to carefully follow the recommendations and follow the work technology.


