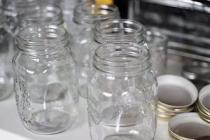
Before starting to prepare various pickles and preserves, any housewife must first properly sterilize the jars.
The sterilization process is simple, although it takes an extra five to seven minutes. However, despite the time spent, you will protect yourself from problems with cloudiness or souring of the cans later during storage.
So, how to sterilize jars at home? Let's look at the most common and convenient methods.
Preparation
Wash the jars with soap and water to remove dirt and dust from the inside. Sterilization will not remove dirt from jars!
Steam sterilization of jars.
There are also several variants of this method.
Option 1
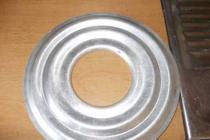
For this method, we will need a special circle for sterilizing jars, which is sold in all dishware and hardware stores and costs from 15 to 50 rubles (see photo). There are circles for one can, and there are for three cans.

We turn the jar over and place it neck down on a circle (as in the photo). And this circle, in turn, is placed on a pan in which water is boiling.
We also throw metal lids into the pan with water, which we will then use to screw the jars on (as in the photo).

How long does it take to sterilize jars using this method? Five to seven minutes and turn off the heat. We take the jar by the side walls with a towel or mittens, turn it over and place it on the bottom on a prepared towel, on which it will continue to stand until we twist it.
Remove the lids from the pan with metal tweezers. If there is no such thing (although every woman has one), then we take it out with two forks and put the lid upside down so as not to contaminate the part with which we will screw the jar.

Option 2
We turn the jar over and “put it on” the spout of the teapot. For these purposes, you need to have a teapot with a long spout so that the jar can hold on it well enough. And the spout should not have a whistle, otherwise steam will not escape through the closed spout and the jar will not be sterilized. We also throw metal lids into the kettle and boil.
Option 3
Similar to the first option. We turn the jar over and place it in a small ladle with boiling water. A circle is not needed, since the jar stands on the ladle with its neck. By the way, in this photo I am sterilizing a jar in a similar way on an induction cooker. A very convenient option.

Sterilizing jars with steam does not kill all germs, since the steam temperature is only 100 degrees. But those microbes that can cause pickles to sour are completely killed at this temperature. Therefore, feel free to use this method without fear of anything.
How to sterilize jars in the oven (dry method)
This method is also very simple. But it requires certain precautions.
Place clean and dry jars in the oven, turn on the heat to maximum and sterilize at maximum temperature. Place metal lids on the grill nearby.
How long does it take to sterilize jars using this method? 10 minutes at maximum temperature.
Then open the oven and let our jars cool.
Attention:
in this method, the jars are heated to temperatures above 250 degrees. Therefore, they may crack if they are placed in the oven while wet, or if they are immediately removed from the oven. Be sure to let the jars cool for five minutes. And take them with a dry towel or mittens so that they do not crack due to temperature changes.

How to sterilize jars in the microwave
This is another way to quickly sterilize jars at home.
Simply place a clean jar in the oven and turn the microwave on high.
Sterilization time is five minutes.
Attention.
There is one “but” here! In this case, on the contrary, you should pour a little water into the bottom of the jar. For what? The fact is that the waves from the microwave heat up the water, not the air. The water in the jar boils, and the walls of the jar are sterilized with steam. If you place a dry jar, it will not be sterilized in the microwave.
And one more thing. Metal lids cannot be sterilized in this way, so as not to damage the microwave. We'll have to boil them again.
It's a busy time for housewives, the harvest is ripening and we want to preserve some of the gifts of summer and autumn for the long winter. After all, how wonderful it is to open a jar of fragrant jam or pickled cucumbers for a holiday, for guests, or just for dinner. Our grandmothers did not bother and many vegetables were salted in barrels and stored in a cold cellar. Now many people do not have this opportunity. Therefore, one of the most popular ways to store products is canning using sterilization. Many experienced housewives know how to sterilize jars for preparations. But I want to tell beginners about the basic rules for preparing and sterilizing jars. It’s such a pity when you spend a lot of time and labor on conservation, but it doesn’t even “survive” until the New Year. I admit that even experienced housewives have failures, I have had the same ones, and I have been making preparations for 30 years. But I always analyze and try to understand their reason. And I even provide an incomplete report of my preparations (as much as fit into the lens).
Therefore, I share my experience with you and hope that my advice will help you enjoy delicious pickles, winter salads, jams, compotes and other preparations in winter.
At the initial stage, jars and lids must be carefully prepared for sterilization, and for this you need to follow the basic rules.

- Strange as it may sound, it is believed that jars that have already been used at least once are more suitable for canning. This is probably explained by physics - tempered glass.
- If you have new jars, then before sterilization I recommend holding them under running hot water (inside and out), let them get used to the high temperatures.
- But it is advisable to use new lids. True, I use screw caps several times if they are not deformed.
- If you have metal lids with rubber bands, make sure each lid has one and check that the rubber band fits perfectly.
- The covers must be free of metal corrosion, otherwise this may render the workpiece unusable during storage.
- If the lids retain the smell from the previous preparations, fill them with water and vinegar or lemon juice for 20 minutes, and then rinse.
- Check the integrity of the neck of each jar. To do this, simply run your finger along the surface of the neck of the jar and make sure there are no chips.
- If you use screw-on lids, I advise you to prepare a corresponding lid for each jar before sterilization and screw it tightly onto the jar. If the lid does not rotate, then you can safely prepare it for sterilization. You can pour a little water inside, screw on the lid and turn it over.
- The main condition for preparing jars and lids for canning is cleanliness:
- jars and lids are pre-washed with hot water and soda;
- kitchen towels and washcloths must be absolutely clean;
- It is advisable to use a new sponge for dishes and then store it separately only for washing cans;
- if you are going to use very dirty jars, then before washing, fill them with hot water and leave to soak for 3 hours;
- and, of course, all vegetables, fruits or berries that you will preserve must be thoroughly washed.
Methods for sterilizing jars at home
You can sterilize jars in several ways: in the oven, in the microwave, on the spout of a kettle, in a saucepan, in a slow cooker, in a double boiler, and even in the dishwasher. Let's get acquainted with each of these methods, and you will choose the most suitable one for yourself.
How to sterilize jars in the oven
Sterilizing jars in the oven is very convenient because several jars are sterilized at the same time, the number depends on their volume and the size of your oven. Be sure to rinse jars and lids with soda before sterilization.

Sterilizing jars in an electric oven
- Place the jars and lids in a cold oven on a wire rack with the neck down. You can also place the jars with their necks up, especially if there is water left in them from washing, but then a not harmful, but unaesthetic white coating will remain at the bottom.
- Metal covers can also be placed nearby.
- Set the mode to “convection” with airflow or “top-bottom heat”.
- Set the temperature to 140-150 °C.
- Close the oven door and sterilize the jars.
- How long does it take to sterilize jars? - 2-3 liters for 20 minutes, liters - 15 minutes, and 500 grams and less - 10 minutes.

7. After the time has passed, remove the jars from the oven using oven mitts or oven mitts and place them on a clean kitchen towel.
The mittens must be dry, otherwise the cans may burst
8. Hot preparations can be placed in the jar immediately, but for cold preparations the jar should cool slightly.
9. I had a hot jar burst several times when hot juice was spilled, apparently it’s more difficult with liquid. Now I cool the juice and the jar a little.
Sterilizing jars in a gas stove oven
The procedure for sterilizing jars in a gas oven is basically the same as in an electric oven, but there are slight differences.

- As in the first case, we place the jars in a cold oven. Neck down or up - decide for yourself.
Do not place jars in the oven very tightly, otherwise they may burst.
2. First preheat the gas oven, i.e. turn it on at 50 degrees, and after 5 minutes increase the temperature to 180 °C.
3. The duration of sterilization is the same as in an electric oven, depending on the volume of the jar. Let’s repeat: sterilize 2-3 liter jars for 20 minutes, liter jars for 15 minutes, and 500 gram and smaller jars for 10 minutes.
4. After turning off the oven, open the door and let the jars cool slightly.
5. Remove hot jars using gloves to avoid getting burned.
Sterilizing jars in the microwave
I am an ardent opponent of cooking food in the microwave and agree with the statement that it destroys the structure of food and harms the body. Although not everyone agrees with this opinion, I will not argue. I successfully removed this device from the kitchen several years ago, but for some reason I didn’t throw it away.
But when I read about the possibility of jars in the microwave, I was happy, because this method speeds up sterilization much faster. True, if you have small jars, since only one 3-liter jar fits in the oven lying down.

By the way, you can also disinfect kitchen sponges and dishcloths using a microwave
- Be sure to wash the jars with soda and pour 1-2 cm of water into each. Pour 1 glass of water into a 3-liter jar.
- Place the jars in the microwave, leaving a little space. Place 2-3 liter jars on a barrel.
- With an oven power of 700 - 800 W, we sterilize 0.5 -1 liter jars for 3 minutes, and for 3 liter jars it will take 5-6 minutes. The main rule: after boiling the water in the jar, 3 minutes should pass. The larger the volume of the can or the number of cans, the longer it takes.
- We remove the jars from the microwave using dry gloves, pour out the remaining water from the jars and place the jars on a clean, dry towel.
- We try to immediately fill hot jars with hot preparations.
Metal lids cannot be sterilized in the microwave!
There is an opinion that using a microwave you can sterilize jars with preparations, and then simply pour boiling marinade over them. This method is most likely good for disinfection, but I doubt the quality of the preparation. Therefore, of course, you can use this method if you are not against microwave ovens.
How to sterilize jars in a pan of water
Well, we all remember and often use the simple classic method of sterilizing jars in a pan of boiling water.

- For this method, a larger diameter pan is suitable to accommodate as many cans as possible. Cover the bottom of the pan with a towel and pour cold water. Determine the water level yourself, the main thing is that the jars are completely covered with water.
- We place the washed jars on the bottom of the pan, neck up, the jars should be completely immersed in water.
- Do not place the jars too tightly together, as they may burst when the water boils.
- After the water boils in the pan, 15 minutes should pass and you can carefully remove one at a time using a mitten or a special device.
 5. In the same pan, you can boil the lids at the same time.
6. Place the sterilized jars neck down on a clean kitchen towel.
First iron the towel on which you will place the sterilized jars with a hot iron on both sides.
Sterilizing jars by steaming
This method has also been very common among housewives since ancient times and does not require any special equipment. However, inside the pan you need to place a wire rack with holes on which you can place the jars. Such grates are sold in stores, and if they don’t have one, you can use a sieve or colander.

- Fill the pan 2/3 with water and place a wire rack or sieve inside.
- Place the jars on the wire rack with the neck down.
- After the water boils, we note the time: sterilize jars up to 2 liters for 10 minutes, and 2-3 liter jars for 15 minutes.

4. When the jars are ready, droplets of water will begin to flow down the walls inside the jars.

5. After sterilization, place the jars neck down on a towel.
After sterilization, the jars can be used for preparations within two days. The main thing is not to touch them or touch the neck of the jar.
Sterilizing jars over a kettle
This method is familiar even to our grandmothers. It is simple and convenient, but slow. It allows you to sterilize only one jar at a time. However, sometimes this is also suitable, for example at the dacha or if you only have a few jars for preparations. We sterilize large 2-3-liter jars for 15 minutes, and smaller jars for 10 minutes.
Moreover, you can simply hold the jar over the spout of a boiling kettle; this method is still suitable for smaller jars.

You can also sterilize jars on the neck of the teapot, not only large ones, but also smaller ones using a little trick.
Sterilizing jars in a double boiler
One of the simple and accessible ways is using a double boiler, if you have one, of course. I myself had no idea that a double boiler can be used not only for preparing tasty and healthy food.

It's all very simple:
- Pour water into the reservoir.
- Place the jars on the grill with the neck down and cover the top of the steamer with a lid.
- Turn on the steamer for 15 minutes and do other things during this time.
Sterilization in a double boiler seemed to me the safest of all
Sterilizing jars in a slow cooker
Evolution moves forward and a multicooker for preparing a variety of dishes has firmly established itself in our kitchen. It turns out that a multicooker, just like a double boiler, can be used to sterilize jars.
Sterilizing jars in the dishwasher
I’ll make a reservation right away that this method does not guarantee complete sterilization, since most dishwashers have a maximum heating temperature that does not exceed 60-70 degrees. Although for such preparations as jam, jam at this temperature is quite enough.

I myself have not sterilized jars this way and most likely I will not, but while preparing the article I found very good advice, which I share with you. A dishwasher is useful for thoroughly washing and drying used cans before storing them. And after that, we close the jars with lids and put them in storage until the next season.
How to sterilize jars with blanks
Some recipes for blanks require sterilization along with filled jars. This method is usually used for canned vegetables, salads, adjika, mushrooms, etc.
How to sterilize jars with preparations in a pan of water

- Pour water into the pan depending on the height of the cans. The water should reach the shoulders of the jar.
- Cover the bottom of the pan with a towel and place the jars on it, not too tightly so as not to break.
- We loosely close the jars with the preparations with sterilized lids.
- After boiling water in a saucepan, sterilize 3-liter jars for 30 minutes, 2-liter jars for 20 minutes, liter and smaller jars for 10 minutes.
- Carefully remove the jars with blanks and screw the lids tightly.
- Turn the jars upside down and cover the top with a towel.
How to sterilize jars with preparations in the oven
This method is convenient because many jars can be sterilized at the same time, especially if the jars are small.

- Fill the jars with the contents and close the lids loosely.
Remember that there should not be a large temperature difference between the can and the workpiece. That is, if you have a hot salad, then hold the jar under running hot water. And if you pour hot marinade into a jar, then do it gradually, little by little.
2. Preheat the oven to 40-50 degrees for 5 minutes. Place the jars in a warm oven and set the temperature to 140-150°C.
3. Sterilize 3-liter jars for 30 minutes, 2-liter jars for 20 minutes, and smaller jars for 10-15 minutes.
4. After removing from the oven, the jars should immediately be tightly closed with lids.
As you can see, there are many ways to sterilize jars; each housewife can choose the most suitable one for herself, or she can use several at once. The main thing is that the process of preparing delicious delicacies in jars for the winter brings you joy from the thought that you will share all this with your loved ones and preserve the summer in jars for a long time.
And I hope that my advice will be useful to you and you will leave your comments, and maybe even advice on this topic.
Preservation is a rather labor-intensive and troublesome process, but it is worth it; all winter you can delight your loved ones with aromatic preserves, various jams, and vitamin compotes.
How to properly sterilize and pasteurize jars?
Sterilization of jars for preservation is actually the first stage in preparation for preservation; after washing, if the sterilization procedure is incorrect, microorganisms will remain on the surface of the jar, which will lead to the fact that the preparation for the winter will simply deteriorate in the coming days. There are several sterilization methods:
- Steam in a saucepan. We take a pan with clean water, put it on the fire, place a sieve on the pan (it should be metal), preferably a special stand, grate, etc. The jar is placed upside down on the stand, wait until the water boils, and sterilize for fifteen minutes jar;
- Boiling. Cans for preservation can be pasteurized not only over steam, but also with water. You need to put a wooden board on the bottom of the pan, now put the jars in it and fill them with water, the water should completely cover the jar. It is important that the banks do not touch each other. Boil for fifteen minutes.
- In a steamer. This method requires a large steamer; if you have one in your kitchen, you can put washed jars in it and set the steamer to boil for fifteen minutes.
- In the microwave. In principle, this is the same steam pasteurization. To do this, pour a little water, about 1 centimeter, into a clean jar and put it in the microwave for a few minutes, setting the microwave power to 700-800 watts.
- In the oven. The jar is washed and placed in the oven, but there is no need to wipe it. The temperature is set to 160 degrees, the jars are heated in the oven, and kept there until they dry out.
- Dishwasher safe. Be sure to place pre-washed jars in the machine and set the maximum temperature.
- In an air fryer. The jars need to be placed on the lower rack, large jars are sterilized for about fifteen minutes, small jars - 7-8 minutes.
Pasteurization of jars is most often used in the preparation of jams and fruit purees. To do this, place the jar in a pan of water, at the bottom of which lies a towel or wooden board. The pan is placed on low heat and we wait for it to boil, after which the jar should boil depending on the recipe, usually from 20 minutes to an hour.
What to do to prevent jars from exploding?
First of all, it is necessary to maintain cleanliness. Wash fruits, hands, and jars thoroughly. Most often, jars of fruit and berries explode; here are some tips on how to minimize the risk of explosion:
- Fruits and berries must be washed thoroughly. Next, take them out, wipe them or put them on a clean towel and let the water drain;
- When preserving a large berry, it is necessary to pour boiling water over it several times, the first time the boiling water is poured for 15 minutes, drained and the syrup is immediately poured in so that the jars of fruit and berries do not cool down, this will help maintain the temperature necessary for preservation. Some housewives prefer to use another option - fruits and berries should be placed in a colander and lowered into boiling water for 15-20 seconds. Then preserved under a warm blanket for a day;
- do not use bad and overripe berries and fruits;
- eliminate all the tails; when twisting apples, you can eliminate the seeds;
- Do not use rotten berries and fruits.
How to prepare jars for canning?
Perhaps this is the first stage in conservation. First of all, jars that will be used for preservation must be thoroughly washed and checked for cracks; even a small crack can split the jar when boiling water is poured into it or it is pasteurized. Particular attention must be paid to the neck of the jar; often this is where chips occur; if there is one, it is not a fact that the lid will fit tightly.
If you plan to use jars with screw caps, then you need to carefully check the lids to ensure they are straight and free of rust. Conventional seaming lids must have a good rubber gasket to ensure an even and tight fit of the lid. If you use detergent when washing jars, then they need to be rinsed thoroughly.
How to tighten jars?
Screw caps can be of several types:
- - tin (traditional) - a special seaming key is used to close the can;
- - twist-off - lids that are screwed onto jars with threads; for this you will also need a special key-handle.
It is difficult to say which lid is better, here each housewife chooses at her own discretion, some prefer to use reusable lids, others prefer disposable ones. The disadvantage of the second option is that finding a large number of jars with threads is sometimes quite difficult, especially for large jars for compote.
So, how should you screw the jars? First you need to wash and boil the lids, make sure that the lid is intact, without dents or bulges. When the jar is ready and filled, and the lid is sterilized, put the lid on the jar, take the key and start rolling.
Here it is worth stepping back and saying that the seaming key can be of two types - a snail key (with a spiral) and a regular key. The first option is best used by those who do not yet have proper experience in twisting or are afraid of twisting or not twisting. The fact is that such a key has a special thread (spiral), which allows you to control the tightening process.
The lid is on the jar, you took the key, now we start tightening it, everything here is, in principle, quite simple. The main thing is to ensure that the edge of the lid fits tightly to the jar.
How to store jars?
How should preserves be stored correctly? One of the main questions of young housewives. To begin with, the preservation must be cooled. The jars should cool slowly; hot jars of preserved food should be turned upside down and covered with a warm blanket or other things.
The main thing is not to place hot cans of preserves in a draft.
Now, finally, let's talk about where to store preserved food? Compotes, syrups, various preserves, etc. should be stored at a temperature of 0 to 20C°, in a dark place, preferably dry. It is necessary to maintain a stable temperature, there should be no sudden changes, this will avoid the formation of condensation, which can lead to rust on the lids.
Of course, it is best if it is a specially equipped basement; it is very important that it has ventilation, at least the most primitive one. Residents of multi-storey buildings often use a balcony for these purposes, however, in the summer it is difficult to store conservation there, especially if the balcony is on the sunny side. Some people use closets, if the corridor allows, then in closets in the hallway, since this is often the coldest place.
All preserves that contain a pit, for example, cherries, plums, apricots, should be stored for no more than a year, since a toxic substance is formed in the pit, which enters the syrup and can even cause poisoning.
Ratio table
| Berry | In 1 glass, mug (or 1 pc.) | In 1 tablespoon | 1 tea spoon |
| Cherry | 190 gr. | 30 gr. | 5 gr. |
| Gelatin (powder) | - | 15 gr. | 5 gr. |
| Strawberry | 170 gr. | 25 gr. | 5 gr. |
| Strawberry | 150 gr. | 25 gr. | 5 gr. |
| Cinnamon (ground) | - | 20 gr. | 8 gr. |
| Raspberry | 140 gr. | 20 gr. | 5 gr. |
| Honey | 325 gr. | 35 gr. | 12 gr. |
| Rowan | 160 gr. | 25 gr. | 8 gr. |
| Granulated sugar | 200 gr. | 25 gr. | 8 gr. |
| Powdered sugar | 180 gr. | 25 gr. | 10 gr. |
| black currant | 180 gr. | 30 gr. | 5 gr. |
| Water | 200 ml. | 18 ml. | 5 ml. |
| Apple(medium) | 1 piece - 100 gr. | - | - |
| Blueberry | 160 gr. | - | - |
| Dried apples | 70 gr. | - | - |
| Dried blueberries | 150 gr. | 15 gr. | 5 gr. |
| Fruit puree | 290 gr. | 50 gr. | 17 gr. |
| Berry puree | 290 gr. | 50 gr. | 17 gr. |
| greyfruit | 275 gr. | ||
| Pear | 135 gr. | ||
| Figs | 40 gr. | ||
| Plum | 30 gr. | ||
| Orange | 130 gr. | ||
| Lemon | 60-75 gr. | ||
| Cranberry | 145 gr. | ||
| Gooseberry | 210 gr. | ||
| Red currant | 175 gr. | 20 gr. | |
| Prunes | 250 gr. | 25 gr. | |
| Apricot | 175 gr. | 25 gr. | 8 gr. |
| Cowberry | 140 gr. | ||
| Rose hip | 20 gr. | 6 gr. | |
| Peach | 160 gr. | ||
| Kiwi | 85 gr. | ||
| Mandarin | 125 gr. | ||
| Banana | 140 gr. | ||
| Apple (Antonovka) | 180 gr. |
How to sterilize jars in a pan of water, many novice housewives do not know, and How many time this procedure must last. This is discussed in detail in this article. The information provided will be useful to every housewife, as it will allow you to qualitatively prepare jars for various preparations for the winter, including how sterilize jam jars.
Preparing jars
Important! To wash the jars, take a new sponge and brush.
- Reusable screw caps are inspected for rust and deformation. If there is even a little rust or scratch, it is not recommended to use such covers so as not to spoil the workpiece.
- Sterilization is carried out with a gradual increase in temperature, since a sudden change in temperature can lead to the jar cracking.
Having selected whole glass containers and washed them thoroughly, proceed to the main sterilization procedure. There are several methods, but most often the jars are sterilized in a pan of water.
Process technology
This sterilization method is convenient to use for small jars with a capacity of up to 1 liter, since during this procedure the jars are placed in a pan and kept in boiling water for a certain amount of time (described below).
Having prepared the jars and selected a suitable pan, proceed to sterilization:

Important! If glass containers do not fit the height of the pan, they can be placed on their side.
This method is very simple and convenient, since it does not require special equipment and you can process a large number of cans at once, of course, if you have a large pan.
Steam sterilization over the pan
This is one of the most common methods for preparing jars for canning. For this method you need:
- small saucepan;
- metal grate;
- banks.
Important! The wider the pan in which the water will boil, the more jars will be sterilized at the same time.
The steam sterilization process occurs as follows:
- Pour water into the pan, almost to the brim, and put it on the fire.
- When the water starts to boil, place a mesh on top of the pan. An oven rack or a stand for hot containers is suitable for this.
- Place the jars on the grill with their necks down.
- Condensation will appear on the inside of glass containers, which collects in large drops and flows back into the pan. You need to hold the jars until the condensate washes their entire inner surface.
- Glass containers are removed from the grill with a potholder and placed on a clean towel on the table, neck down.
Important! The lids can be kept in boiling water for several minutes.
Sterilization of jars is carried out within 6-10 minutes. It all depends on the intensity of boiling water. They remain clean for 2 days.
Watch the video! Sterilization of canning jars
You can also sterilize steamed jars inside the pan:
- Place a wire rack or metal lids on the bottom of the pan.
- Glass containers are placed on the grill with the neck down. The main thing is that there is a distance between the bottom of the pan and the neck of the jar.
- Pour some water and put it on fire.
- When the water begins to boil, the steam will clean the inside of the jars.
The advantage of this method is that the steam does not rise high and does not increase the humidity in the kitchen. For greater effect, the pan can be covered with a lid.
Watch the video! How to sterilize jars and lids before canning
Sterilization with blanks
Not only empty jars can be sterilized, but also with blanks. Usually this method is used when canning lecho, adjika and vegetables. salads in jars small in size, which are prepared using cooking.
How to do it right carry out sterilization:
- The hot workpiece is placed in washed jars and covered with a lid.
- Place a cloth on the bottom of the pan and place glass containers.
- Pour warm water so that it covers the jars up to the neck, but does not get into the inner space when boiling.
- Place the pan on the fire and bring the water to a boil.
- From this moment, 15-30 minutes are timed.
Important! How much to sterilize cans depends on the volume of container. For 0.5 l - 15 minutes, for 1 l - 25-30 minutes.
- After the specified time has passed, the containers are removed from the hot water with special tongs and the lids are rolled up.
Many salad recipes for the winter provide for this type of sterilization, since the preparation undergoes additional heat treatment during the process.
There are many ways to sterilize jars, which rely on the use of high temperatures and other electrical devices. You can find out more about using it in the microwave and in a double boiler on our website.
Conclusion
The shelf life of the preparations for the winter depends on the high-quality sterilization of the jars. Therefore, this process should be given special attention. Improperly prepared containers can damage the cans and cause the products to deteriorate.
Watch the video! Sterilization of jars with cucumbers - an original method of sterilization
Supermarkets offer a huge selection of preserves for every taste: from banal pickled cucumbers to exotic fruit jam. And before, our grandmothers and even mothers cooked and prepared jam for the winter on their own. You open the pantry - and there are glass jars on the shelves, through the transparent sides of which pitted cherries, strawberries, halves of pears and apricots are seductively visible. This is what we propose to talk about today about banks. About how to choose them correctly and prepare them for preservation, so that delicious homemade jam will last in them until winter and the taste of fruit will remind you of summer.
First of all, take suitable jars. Each housewife determines the volume and quantity according to her wishes, the main thing is that all jars are free from defects. Carefully inspect each one for the smallest cracks, chips and nicks - all this can ultimately have a detrimental effect on the life of our future conservation. The same applies to the lids: they must be perfectly even.
Methods and means for sterilizing empty jars
Modern housewives are much luckier compared to their predecessors, who were engaged in conservation a couple of decades ago. Today there are several ways to sterilize jam jars, and you are free to choose the one that seems more effective and convenient to you than others.
- Water vapor Our mothers and grandmothers had only one method at their disposal: sterilizing jars with steam over a saucepan or kettle of boiling water. To use this proven method, pour water into a wide container (saucepan, metal bowl or basin) and place on fire. When the water boils, do not turn off the flame, but place a metal sieve of suitable diameter on top. Place the jars on the sieve, neck down. Three-liter jars should be kept over steam for 15 minutes; for liter jars, 10 minutes is enough. As soon as water begins to flow down the inner surface of the walls of the jars: it’s done, the jars are sterilized and ready for canning. If you used a kettle to produce water steam, you can hold the jar over its spout by wrapping it in a kitchen towel. Otherwise, the technology does not change.
- Microwave oven. If grandma's method is not to your taste, call on modern household appliances to help you sterilize jars. For example, it is very convenient to do this in the microwave. The only drawback of this method is the limited space inside the microwave oven, so the procedure will have to be repeated several times. In addition, not every can will fit in the oven in height. Otherwise everything is very simple. Pour about two centimeters of clean water into the bottom of each jar. Place the jars of water in the microwave and turn it on at maximum power. The water in the jars will quickly boil and begin to evaporate, thereby sterilizing our dishes. Once all the water has evaporated, you can remove the jars from the microwave and place the jam in them.
- Oven. For those who are afraid to use a microwave for such unconventional actions, the method of sterilizing jars in the oven is suitable. Simply place empty, clean jars, neck down, on the rack of a cold oven. Turn on the oven for 15 minutes, and after this time the jars will be sterilized and completely ready for the canning process.
- Double boiler. And, of course, to sterilize jars, it is logical to use a household appliance such as an electric steamer. It can be an excellent sterilizer: just place clean jars with the neck down and turn on the “cooking” mode. 10-15 minutes will be enough for the jars to become sterile.
All these methods apply to empty jars intended for subsequent placement of jam or other preparations for the winter. But some housewives sterilize already filled jars. To do this, place a towel on the bottom of a wide pan, place the jars tightly on top of it, and fill with cold water. The jars should stand strictly vertically in the pan and the walls should fit tightly against each other, not dangle or move in the pan. Light the fire, and after the water boils, “cook” the jars in the pan for about 15 minutes. After this, the lids can be rolled up and the jars can be left to cool in a dry place at room temperature.
When choosing lids, make sure that they perfectly match the diameter of the necks of the jars. Any gaps or inconsistencies are unacceptable. The lids also need to be sterilized, and you can do this using any of the methods listed above for sterilizing jam jars. Only the microwave is not suitable for sterilizing lids. Keeping the lids over steam or sterilizing them in the oven for 2-3 minutes is enough.
It is very important to understand that sterilization of jam jars and lids is needed not only so that the preservation lasts as long as necessary. In addition, unsterile jars often contain bacteria that can cause food poisoning, sometimes very severe. Therefore, treat the sterilization process quite responsibly - this is important not only for the preservation of the jam, but also for the health of your family members.
Sterilizing jam jars is a rather delicate matter, requiring at least a little experience from the housewife. Don't be discouraged if you don't succeed the first time or if something goes wrong. In addition, each housewife prefers her own method, chosen among others by trial and error. Consult your mother and friends, and don’t be afraid to experiment on your own. Of course, it’s a pity to lose preparations for the winter due to improperly prepared jars or lids. But over time, you will master all the nuances of this process, and your jam will delight your household all winter.